Installing a Site roof window: Stage 1
1. How to prepare the roof window and flashing kit prior to installation
This series of guides will take you through the process of installing a Site roof window on high profile clay tiles using a Site flashing kit designed for these tiles.


Each section is detailed to ensure you get all the information you’ll need to help you complete the job.
The project has been split in to several articles to take you through each stage of the process in manageable chunks.
Stage 1:
Stage 2:
Stage 3:
Stage 4:
Our range of roof windows is available in a variety of standard sizes. If you are replacing a roof window, it’s key to make sure you’re buying the right size replacement window for your project. When measuring, you should measure the external frame size before shopping for the replacement products.
When installing a new roof window, you must check the angle of the pitch is compatible with your choice of window. You will also need this measurement to hand when it comes to fitting the window.
How to measure the angle of a roof
You can either use a digital angle measurer to measure the pitch of the roof or use a smart phone with a measuring app. Once the app is downloaded onto your smart phone, hold it in place on top of a 1m length of timber down the slope of the roof and make a note of the angle. The timber helps to measure the slope of the roof rather than the slope of the tile, which can be different.
Planning
Before finalising any plans to install your new roof windows, be sure to check with your local council whether planning permission will be required.
Timing
Check the weather forecast and plan your installation on a dry day, with the right tools and materials to-hand, a roof window can be fitted in less than a day.
-
Before you start, use a high visibility tape or cones to cordon off the area below the roof where you are working to protect passers by from falling objects or debris
- Use a step ladder when fitting a window from the inside of the roof. All the replacement work can usually be carried out from inside the roof, so there’s no need for scaffolding. If you need to work from the outside of the roof space, erect the appropriate scaffolding
-
Windows, especially larger windows, can be heavy, so have the assistance of a friend when lifting and fitting the window into it’s opening
- Site roof window
- Site flashing kit
-
High visibility safety tape and / or cones to cordon off the area


Lay dust sheets on the loft floor, especially if the loft has been decorated.
Step 2
Unpack the window and flashing kit in the loft. Read the instruction manual and check all the fixings and fittings are included as listed in the manual.
Once the roof window is unpacked, only carry it by lifting it from the underside of the baseplate and store flat on the floor.


Step 3
Dispose of the packaging so you have a clear area to work in.
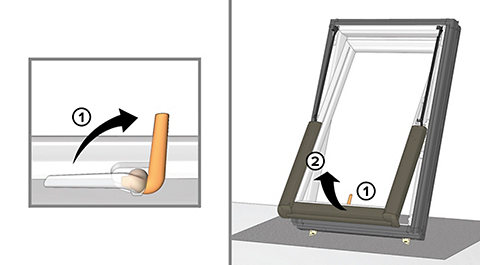
To install the frame, you must first of all, separate it from the sash. Slide off and park the aluminium cover from the top half of the window frame.
Turn the pre-fitted handle to the open position and push the sash to open the window.


Step 5
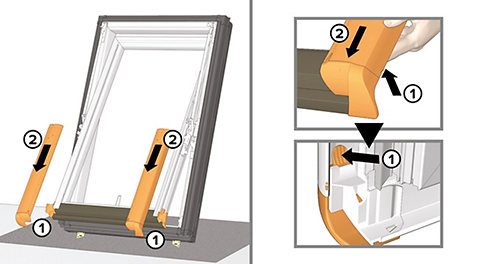
Push the buttons under the sash and remove the bottom aluminium covers one at a time from the window. Again, park these covers in a safe place for refitting later.


Step 6
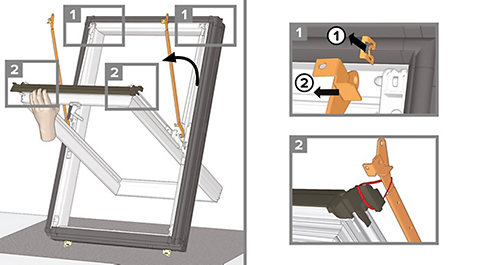
Remove the two metal clips from the top two corners of the window frame and release the metal arms. Keep the plates in a safe place as we’ll need these again later.
Attach the two bands to the ends of the two sash arms to help keep them in place on the sash and stop them waiving around.


Step 7
Remove the sash from the frame by rotating and lifting out as shown.
With the frame and sash now separated, store all the parts safely until required later in the project.