See more Laminate flooring
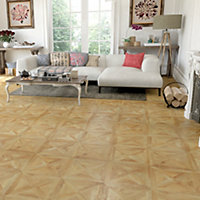
GoodHome Staccato Natural Wood effect Laminate Flooring, 1.86m²
€
52.08
€
28
per m²
Pack option
Checking availability...
Product details
Product information
This Goodhome laminate flooring perfectly imitates the look and the feel of real wood, with a 4 sided bevelled edge creating an authentic wood flooring appearance. This flooring is perfect for hallways, living rooms and bedrooms and is easy to lay with simple click fitting system installation. All our laminate flooring is sourced from responsibly managed forests. Laminate should be built to last, that's why we've guaranteed ours for 20 years. We recommend using a suitable underlay to ensure better thermal and acoustic performance of your flooring.
- Guarantee - 20 years
- Fold down system
- Suitable for Bedroom, hallway & living room
- Suitable for use with underfloor heating
Features and benefits
- This versatile laminate flooring is ideal for use in hallways, living areas, and bedrooms.
- Our GoodHome laminate flooring is responsibly sourced, helping preserve the planet's natural resources.
- Enjoy a 20 year guarantee on this GoodHome laminate flooring, giving you peace of mind for longer.
- Easy to install yourself with the simple click fitting installation system.
- Compatible with underfloor heating systems for warmth - at your feet and in your room.
- The 4 side bevelled edge give a classic, authentic wood appearance.
Specifications
| Brand | GoodHome |
|---|---|
| Effect | Wood effect |
| Style | Modern |
| Finish | Matt |
| Surface finish | Embossed |
| Material | High-density fibreboard (HDF) & paper |
| Product length | 1180mm |
| Product width | 395mm |
| Product thickness | 12mm |
| Coverage | 1.86m² |
| Pack quantity | 4 |
| Underlay type required | Cork, foam, XPS or wood fibre |
| Abrasion class | AC5 |
| Standard | EN 13329 |
| Made in | Spain |
| Product code | 5063022038586 |
